How to Clean Printer Drum: Step-by-Step Guide
How to Clean Printer Drum: Step-by-Step Guide
Your laser printer is producing streaks, faint spots, or smudged output at regular intervals down the page — and you’ve already replaced the toner cartridge without improvement. The issue is almost certainly the drum unit. Knowing how to clean printer drum components properly can extend drum life significantly and restore print quality without buying a new drum. If cleaning doesn’t resolve the issue, replacement is straightforward too.
This guide covers exactly how to clean a printer drum safely, what tools you need, what to avoid, and how to tell when cleaning is the fix versus when the drum simply needs replacing. The iOS-related keywords (how to downgrade to unsigned ios and how to add m4r to iphone) that appear in this post’s keyword cluster are unrelated to drum cleaning and are addressed briefly at the end for completeness.
When to Clean vs. Replace the Drum
Signs That Cleaning Will Help
A drum unit that benefits from cleaning typically shows toner contamination on the drum surface — visible as dark smudges, fingerprints, or toner dust if you open the drum compartment carefully. Light scratches, small toner deposits, and minor contamination all respond well to cleaning. If the drum surface is visually clean but output is still degraded, cleaning won’t help — the drum is past its rated life and needs replacing.
Signs of Drum Wear Requiring Replacement
Deep scratches on the drum surface, areas where the photosensitive coating is worn off (appears as a shiny patch on an otherwise matte drum), or persistent repeating defects that don’t improve after cleaning all indicate that cleaning how to clean a printer drum won’t restore output. At this point, replacement is the correct step. Most drum units have a rated life of 12,000–30,000 pages printed — a drum approaching that count is worth replacing proactively if print quality matters.
How to Clean a Printer Drum: Step-by-Step
Tools needed: clean lint-free cloth or foam swab, isopropyl alcohol (90%+ concentration), dry soft cloth, and latex or nitrile gloves to prevent skin oils from transferring to the drum surface.
- Power off the printer and unplug it. Let it cool for 10–15 minutes if recently used — the fuser gets very hot.
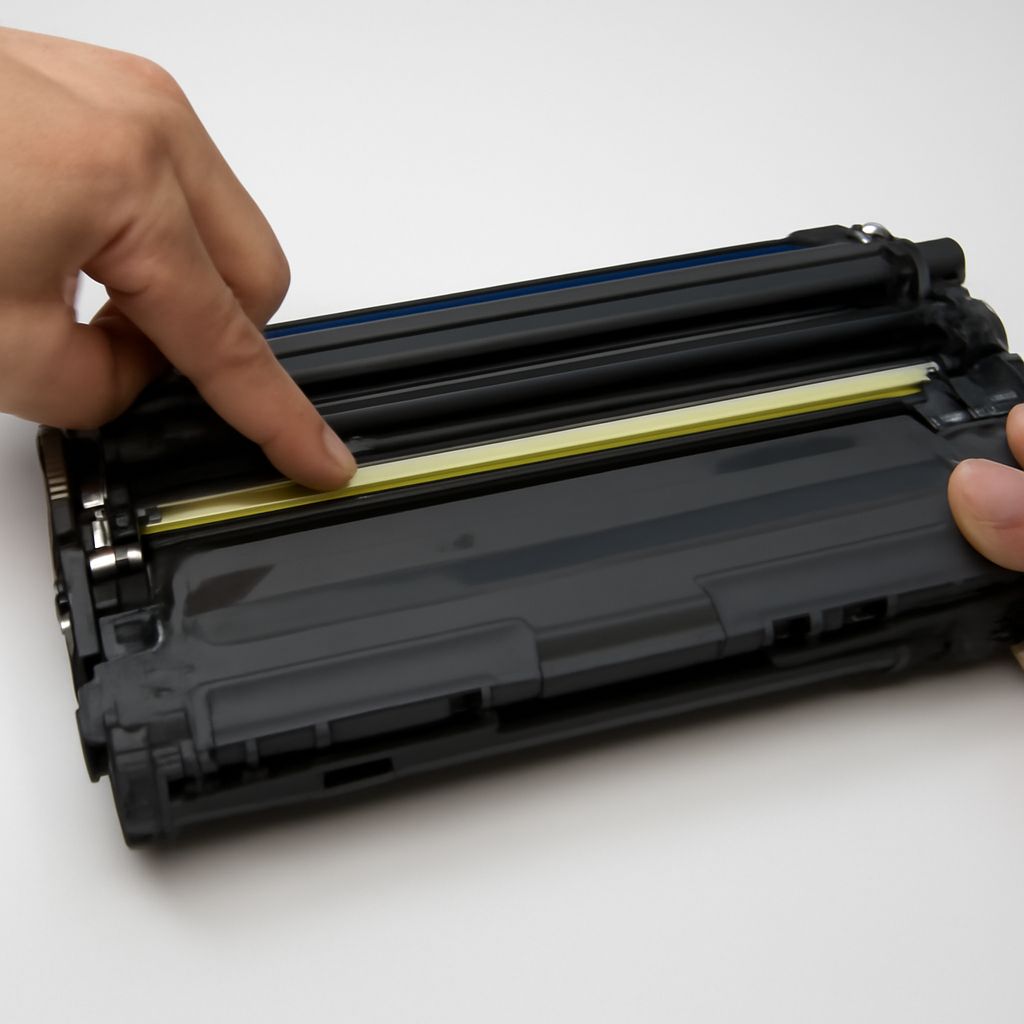
- Open the printer and remove the drum unit according to your model’s manual. Handle the drum unit by its frame, never touching the green or blue photosensitive drum surface.
- Inspect the drum surface under good lighting. Look for toner accumulation, contamination, or physical damage.
- Dampen a lint-free cloth or foam swab lightly with isopropyl alcohol. Do not saturate — excess liquid can damage the drum coating.
- Gently wipe the drum surface in one direction. Do not scrub or use circular motions. Use light, even pressure.
- Allow the drum to air-dry completely — typically 5–10 minutes at room temperature — before reinstalling. Never blow-dry or use heat.
- Reinstall the drum, close the printer, plug it back in, and run a test page.
Common Mistakes to Avoid
Never touch the drum surface with bare hands — skin oils cause permanent contamination spots. Never use abrasive cloths or paper towels — these scratch the photosensitive coating. Never clean a drum that has physical scratches — you’ll just remove the coating faster. Never use water instead of isopropyl alcohol — water takes too long to dry and may cause toner adhesion issues.
iOS Tips: Downgrading and Adding Ringtones
Briefly covering the related search topics: downgrading to an unsigned iOS version is not officially supported by Apple — Apple stops signing older iOS versions after a grace period, making it technically impossible to downgrade through official channels after that point. Jailbreak-based methods exist but void warranties and create security risks. Adding an M4R ringtone to iPhone is done through iTunes or Finder on Mac: create a 40-second-or-less AAC file, change the extension to .m4r, add it to your iTunes library, and sync ringtones to the device. On newer iOS versions, the GarageBand app also lets you create ringtones directly from audio clips on the device.
Bottom Line
Cleaning a laser printer drum with isopropyl alcohol on a lint-free cloth removes minor contamination and restores print quality when streaks or smudges are caused by surface deposits rather than drum wear. Handle the drum only by its frame to avoid skin oil contamination, let it dry completely before reinstalling, and replace rather than clean when the drum surface shows physical scratches or coating wear.